
How UberDDR3 Stays Stable: GoCD-Powered CI for Serious Hardware - Post #16
- Angelo Jacobo
- Jun 4, 2025
- 9 min read

Writing RTL is just the beginning — the real challenge is making sure it works under pressure and keeps working as your project grows. In this post, I will walk you through UberDDR3’s Continuous Integration (CI) pipeline: from lint checks to deep dives in formal verification, testbench simulations, and full FPGA builds.
And because life’s too short to rerun tests manually, I’ll show you how I wired everything up with GoCD to automate the process — turning hours of manual effort into a hands-free, reliable CI system.
If you’re curious how real-world hardware projects stay robust as they scale, read on!
Table of Contents:
I. About Continuous Integration (CI)
Continuous Integration (CI) is a development practice where developers regularly push small code changes to a shared repository—and each push automatically triggers tests and builds to verify that everything still works.
Originally popular in software development, CI is now becoming just as important in hardware design, especially with complex IP blocks like memory controllers, which can easily break if one logic change isn't thoroughly verified.
The core idea of CI is simple: "fail fast, fix fast." By automatically checking for errors right after code is updated, developers avoid the pain of debugging large batches of changes later on. This short feedback loop helps teams move faster and build more reliable systems.
In the context of UberDDR3, our open-source DDR3 controller, CI plays a crucial role:
It ensures that new contributions don’t break existing features.
It runs formal verification, testbench simulations, and FPGA build check every time code is pushed.
CI helps UberDDR3 stay stable, testable, and trustworthy — qualities that matter for open hardware just as much as for open software.
II. How UberDDR3 Uses CI: A Three-Step Testing Strategy
Our CI strategy for UberDDR3 runs three main types of tests:
Linting and Formal Verification – to catch simple mistakes and logic errors early
Testbench Simulation – to make sure UberDDR3 behaves correctly in different scenarios
OpenXC7 Build Test – to confirm the design still builds properly using the open-source FPGA tools
With these 3 steps, we can catch issues early and keep development smooth. We’ll go through each of them next.
III. Linting and Formal Verification
Before running simulations or building for FPGA, we start with two important checks to improve code quality and catch bugs early: lint and formal verification. While both help verify the design, they serve very different purposes.
III.I Lint: Quick Static Checks
Lint is like a spellchecker for Verilog and SystemVerilog. It quickly scans the code to catch common issues like undeclared wires, unused signals, or poor coding style. It doesn’t simulate or prove behavior — it just flags things that “look wrong” in your code.
UberDDR3 uses Verilator, an opensource Verilog simulator, for performing lint checks.
The lint command is run via run_compile.sh:
It scans the main DDR3 controller and ECC modules for common coding issues before moving on to deeper verification steps.
If the lint step detects warnings or errors, they will be printed in the terminal. Otherwise, a clean result simply shows "DONE!":

III.II Formal Verification: Proving Logic Correctness Without Testbenches
While lint is quick and surface-level, formal verification goes deep.
Instead of testing a few scenarios with a testbench, formal verification mathematically proves that certain properties always hold — across all possible inputs, forever. No testbench is needed — just your RTL and a set of assertions (properties) to check.
UberDDR3 uses SymbiYosys, an open-source formal verification tool, for this. The same shells script run_compile.sh script runs all sby files in the formal/ directory, including:
ddr3_singleconfig.sby: Tests a single basic setup with default parameters
ddr3_multiconfig_default.sby: Tests a variety of configurations with different lane counts, frequencies, and delay options
ddr3_multiconfig_ecc.sby: Focuses on ECC-specific scenarios across multiple configurations.
Formal verification takes more time to complete because it exhaustively checks all possible input scenarios and runs across multiple configurations. On my laptop, the full set of formal checks takes around 3 hours to finish!
At the end of the process, the script summarizes the results of each run — clearly showing whether each configuration PASS or FAIL.

By combining lint (for quick code sanity checks) and formal verification (for exhaustive logic correctness), UberDDR3 builds a strong foundation of trust — before we run simulations or attempt synthesis.
IV. Testbench Simulation: Verifying Behavior Through Realistic Scenarios
Testbench simulation is a time-tested and powerful way to verify digital designs. It runs your HDL code together with a testbench that mimics real-world inputs and checks outputs—acting like a scripted user interacting with your design.
For UberDDR3, we simulate the controller alongside the Micron DDR3 SDRAM Verilog model, which accurately represents a real DDR3 memory device in simulation.
The testbench powers up UberDDR3 from reset and lets it perform:
Internal calibration
A built-in self-test (BIST) phase that includes:
Burst writes and reads
Random access patterns
Alternating write-read sequences
After BIST, the testbench issues Wishbone transactions that perform burst and random reads/writes to various memory regions—like the first, middle, and last rows.
IV.I Regression Testing Across Configurations
As with formal verification, we don’t stop at a single run. We perform regression testing by running the testbench across multiple configuration sets with varying clock periods, lane counts, delay settings, and BIST modes.
This ensures the controller behaves correctly across a broad range of scenarios.
The script regression_test_icarus.sh automates the entire process. It:
Tweaks test parameters
Runs each configuration using Icarus Verilog, an open-source Verilog compiler and simulator.
Generates a log file after each run, showing whether the simulation passed or failed.
A single testbench run can take up to 45 minutes, and completing the full regression suite takes nearly 5 hours on my laptop. Here's what the terminal output looks like once all runs are complete:
Because of the long runtime, I usually let it run overnight and check the log files the next day. With so many configurations covered, passing all tests gives me strong confidence in the robustness of UberDDR3.
V. OpenXC7 Build Test: Running UberDDR3 on Real Hardware
After verifying that UberDDR3 works in simulation and formal verification, the next step is to test it on actual hardware.
V.I What is OpenXC7?
OpenXC7 is an open-source FPGA toolchain for Xilinx 7-Series devices. It allows developers to synthesize Verilog designs, place and route them, and generate bitstreams — all without relying on proprietary tools like Vivado. It’s perfect for open-source projects like UberDDR3.
V.II UberDDR3 Demo Overview
The hardware demo for UberDDR3 is straightforward: It initializes the controller from reset, goes through internal calibration, and then runs the built-in self-test (BIST). If the BIST passes, all LEDs turn on. The BIST is comprehensive — it writes and reads across the entire DDR3 memory space using three different access patterns: burst, random, and alternating.
UberDDR3 includes example demos for multiple FPGA boards, located in the example_demo directory. Running make inside each board-specific folder synthesizes the design and generates a bitstream using OpenXC7.
For convenience, there's also a script run_make_all.sh that builds all demos automatically. Below is the result after the script is run:

At the end of the run, each board folder should contain a .bit file — ready to be programmed to the FPGA with the make program command.
VI. The Dilemma: Ensuring Reliability with Every Code Change
The UberDDR3 development flow — Lint → Formal Verification → Testbench Simulation → OpenXC7 Hardware Build — gives high confidence that the controller is working as expected. It ensures correctness across code quality, logic proofs, simulations, and even real hardware execution.
Naturally, we want this level of confidence every time a new feature is added or code is modified. But here’s the problem:
Each step takes time — testbench simulation alone can take 5 hours or more.
Running everything manually involves launching multiple shell scripts and waiting for them to finish.
As the codebase grows, these checks become even more critical to prevent regressions.
This is where Continuous Integration (CI) comes in — and specifically, GoCD.
VII. GoCD Continuous Integration: Automating the Full Flow
GoCD is an open-source CI/CD (Continuous Integration / Continuous Delivery) server. It automates workflows by organizing tasks into pipelines that run whenever code is changed.

For UberDDR3, GoCD can be configured to trigger a pipeline every time there’s a new commit. The pipeline consists of the same trusted flow:
Lint Check (Verilator)
Formal Verification (SymbiYosys)
Testbench Simulation (Icarus Verilog)
OpenXC7 Bitstream Generation
Each step runs in sequence, only proceeding if the previous one passes. This ensures broken code never reaches later stages like bitstream generation.
By using GoCD, we turn a tedious manual testing process into a fully automated pipeline!
Note: The GoCD server was already set up by our team, so I’m not deeply familiar with the nitty-gritty details like agent configuration, resource tagging, etc. The next section assumes that GoCD is already up and running with the necessary tools installed.
VII.I Configuring the Stages for the UberDDR3 Pipeline
In GoCD, a pipeline is a series of automated steps that run every time you push code. Each pipeline is made up of stages, and each stage can have one or more tasks—individual shell commands or scripts that do the actual work.
This is visualized clearly below (retrieved from GoCD documentation):

I won’t walk through the full step-by-step setup of a creating new pipeline — that’s what the GoCD documentation is for, and it’s well-written and beginner-friendly.
Instead, let me show you the actual stages configured for the UberDDR3 pipeline. As you can see in the screenshot below, the process is broken into five stages:

Stage 1: formal_verif – Lint + Formal Verification
This runs the run_compile.sh script, which performs both the lint check and the formal verification:

Stage 2: simulate_single – Basic Testbench Simulation
This stage runs a single simulation with default configuration. It executes the sim_icarus.sh script.

Stage 3: simulate_all – Full Regression Simulation
This stage runs the regression_test_icarus.sh script, which simulates UberDDR3 under many different configurations (clocks, delays, lanes, BIST modes).

Stage 4: openxc7_singlebuild – Arty S7 Bitstream Build
This stage runs the Makefile inside the Arty S7 demo directory, generating a bitstream for that specific board:

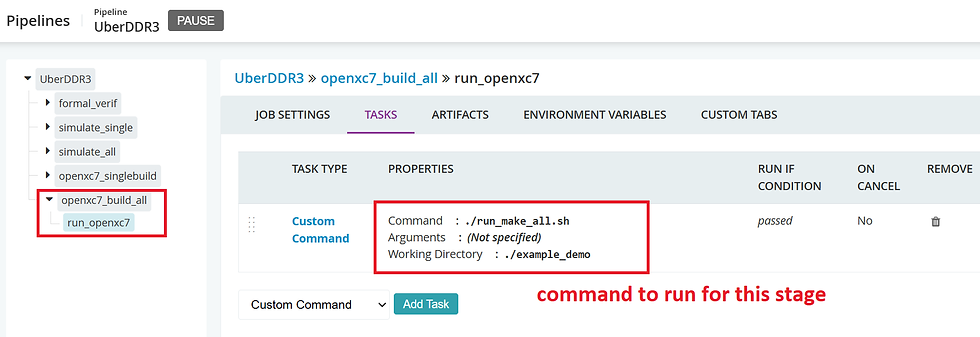
Stage 5: openxc7_build_all – Build All Board Demos
This stage runs the run_make_all.sh script, which synthesizes and builds all FPGA board demo configurations listed in the example_demo/ directory.
VII.II Artifacts: Keeping the Important Stuff
In GoCD, artifacts are files you choose to save from each pipeline run—like logs, bitstreams, or test reports. These are crucial because once a job finishes, anything not explicitly marked as an artifact gets discarded.
That’s right — your test logs, .bit files, or any output won’t be available unless you set them up as artifacts in the pipeline config.
For example, in the regression test (stage 3), we preserve the log files from each simulation run so we can review results later:

Likewise, in the OpenXC7 build stage (stage 5), we save the generated .bit files and build logs so the output can be flashed to hardware or checked for issues:

With this, the setup for UberDDR3 pipeline is now complete.
VIII. Testing the GoCD Pipeline for UberDDR3
Once the UberDDR3 pipeline is fully configured in GoCD, testing it is straightforward—and satisfying.
You can manually trigger a run using the force-run button, but the real magic happens when GoCD reacts to a new commit in the UberDDR3 GitHub repository. For this example, I made a harmless test commit.
As expected, GoCD automatically detected the change and triggered the pipeline:

The yellow status bar shows that the pipeline is currently in Stage 1. From here, we simply let it do its thing.
As the stages progress, we can visually track their status. Eventually, we see the best sight in CI: All green. All passed. ✅

Below, we can see the full 5-stage layout of the UberDDR3 pipeline as defined earlier.

Looking deeper into the completed run, we can confirm that all essential artifacts were successfully preserved. As shown below, the .bit files generated from the OpenXC7 build stage are now available for download directly from the GoCD interface.

From there, we can easily flash these files onto our FPGAs using our own local machines — no need to rebuild anything manually.
Looking at the Value Stream Map page, we see that the full run took over 8 hours to complete:

This is completely expected. Stages like formal verification and regression testing run multiple configurations thus takes time.
And this is exactly why Continuous Integration (CI) tools like GoCD are game changers. Imagine running each of these long processes manually, one by one. With this CI setup, I just push a commit, go to bed, and wake up with everything done!
IX. Conclusion
As UberDDR3 continues to grow, so does the risk of subtle bugs creeping in. That’s why having an automated pipeline — from lint to simulation to real FPGA builds — isn’t just a luxury, it’s a necessity. Catching issues early, right as you push that one commit, saves hours of head-scratching later.
With GoCD keeping the test flow always on and always up-to-date, UberDDR3 stays stable, scalable, and ready for whatever comes next.
That wraps up this post. Catch you in the next blog post!


Excellent . I am a hardware engineer and have never got the chance to use CI / CD tools , still you are able to put the things in my mind very clearly .